Want a perfect crust for your pies and tarts? Learn how to blind bake, the method behind making a naked, cooked crust. Plus, my 6 tips for doing it better!

This month we've played around with a lot of different edible flowers, and brushed up on some baking methods, so I thought I'd wrap up our month with a practical baking skill - how to blind bake. For most people, blind baking really does make them feel blind because there aren't a lot of markers to tell you if you're doing it right, but once you have a basic understanding of blind baking, you'll be a tart and pie making expert in no time!
What Is Blind Baking?
Blind baking is when you bake a pie or tart shell by itself, without any filling. Sometimes you only partially bake it, like when you want to put a filling it in later that you want to set up. Other times, like with last week's Rose Curd & White Peach Tart, you bake it completely. Blind baked crusts tend to be used more often when you are making custard pies, fruit tarts, or silk pies, but really, they're mostly used when the filling needs to be cold, or uncooked. There is an exception though, and that's pumpkin pie - which has the tendency to make the crust soggy, so partially blind baking the crust can save your Thanksgiving dessert from getting sad.
Hopefully, if you are working with a recipe, it will tell you to blind bake (also called "pre-baked" or "baked and cooled") your crust beforehand, but if you get halfway into a recipe and realize something doesn't seem right, follow the process below to blind bake your crust.
How To Blind Bake
Blind baking is really quite simple. All you'll need are three tools to help make sure you get it done perfectly: a fork, dry beans or pie weights, and parchment paper.
- Preheat your oven to 425°F (or whatever your recipe calls for).
- Fit your pie dish or tart pan with the dough (here is my favorite pâte brisée crust recipe) and use a fork to pierce the flat part of the dough several times, about 1-2 inches apart. This is called "docking". This allows for steam to escape during the baking process, which keeps the crust from bubbling up in spots and giving you inconsistent height. This step is especially important if you are using something smooth for your filling, as the bumps from the air will be a lot more noticeable and difficult to fill around.
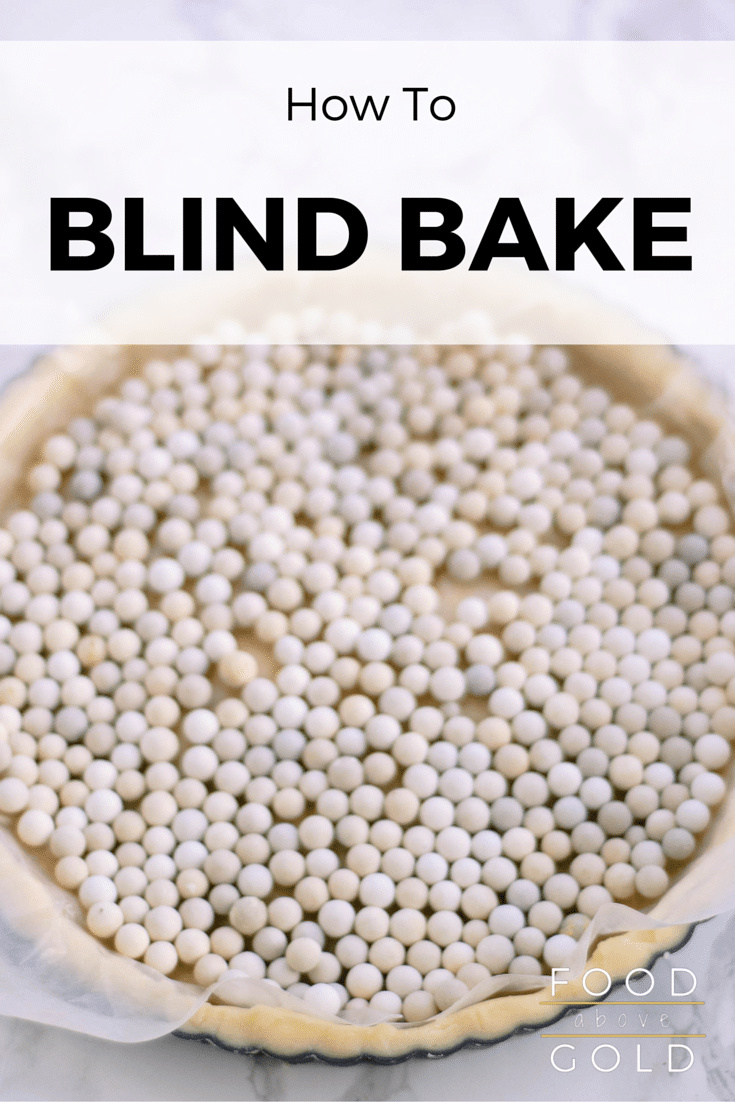
- After you have pierced your crust, you want to line it with parchment paper, making sure it hangs over somewhat (stands up is more like it) so it doesn't prevent your edges from browning. You want to have enough extra parchment that you'll be able to safely grab it and remove the weights without damaging the crust. Fill your parchment with your weights or dry beans.
- Bake according to the directions and cook it until the edges start to brown (in my experience, that takes most recipes around 10-15 minutes). Once that time comes, remove your crust from the oven and remove the pie weights; but be careful, so you don't accidentally take some of the crust with you. If you're parbaking your crust, this is the end of the road for you, but if you're going to cook the crust until it is completely baked through, put it back in the oven and bake until the flat part of the crust is the lightest hue of golden brown. bake until the bottom of the crust begins to turn golden brown. NOTE: Make sure to wear oven mitts when moving around pie weights or beans because they get hot, hot, hot.
Some recipes may call for you to only pierce your crust, or to only use pie weights. The choice is totally up to you, but I prefer to do both and have all my bases covered. Plus, using the pie weights means that it will help hold up the edges of the crust, which has a tendency to sag during the baking process if not properly supported (or very cold from the refrigerator).

Tips For Blind Baking
Just to make sure that your blind baked crust turns out to absolutely perfection, here are my 6 tips to help!
#1. Pie Weights
If you choose to go the route of ceramic pie weights, don't forget to gently hand wash them when you're done because some of the fat from the pie crust will come through the parchment paper and lightly coat the weights. This fat can go rancid down the road, so you want to wash and dry your weights completely before storing them. For this same reason, if you've chosen to use beans, you won't want to eat them afterwards, but you can gently wash them and store them for blind baking later.
#2. No Parchment Paper?
If you don't have parchment paper for holding your pie weights, don't fret, you can make a very large sachet out of cheesecloth instead. Don't have cheesecloth? Aluminum foil will do the trick just as admirably, but see tip #3 for best results. Just whatever you do, stay away from wax paper. That was a lesson I learned the hard way.
#3 Easy Removal
If you look closely at the pictures of my Rose Curd & White Peach Tart, you'll notice that in some spots the crust looks like it's a little deformed. That's from when I pulled my parchment off of my crust and it took quite a bit of the crust with it. To help prevent this, I recommend brushing the top of your crust with some melted butter before setting the parchment (or whatever transportation you've chosen) on top. It helps with the sticking right from the get-go.
#4. Cold As An Ice Queen's Heart
For the best results, make sure that your crust is extremely cold before baking; this will help prevent shrinking. I like to line my crust with the parchment and weights and then refrigerate (or freeze) it for at least an hour before baking to make sure to give the crust the best chance possible.
#5. Overhang
In many recipes you'll see that it calls for 1" of overhang. This is very useful when you blind bake because it helps make up for/prevent any shrinking. You'll want to carefully fold it under itself along the rim of the pan to create a nice thick and smooth lip for the crust.
#6. Blind Baking Is Like Pie Baking
Standard pie-baking rules apply when you're blind baking, so if it works for making a pie, it should work for just the crust. Check out my post on the biscuit method which goes over everything you need to know about how to properly cut your fat into the flour (plus answer the question of hands vs. pastry cutter). Also, I recommend checking out this post from last year about how to troubleshoot pie dough - most of the principals are transferable.
Practice Makes Perfect
If you want to try making some yummy recipes that use blind baked crusts, I recommend:
Thanks so much for stopping by!
What are your favorite things to make with a blind baked crust? Do you have any tips for a better blind baking experience? Tell me about it in the comments or show me on social media - @foodabovegold. Tag it with #CallMeMichelin to show off how you learned to blind bake!
Happy Cooking!


Marsha says
Thanks for your tips. I've noticed that Mary Berry (UK) uses "cling film" to line a pie shell before putting in weights. It's great for getting in the crevices of a tart, but I worry about chemicals leaching out from the film. What about using a thin muslin?
Thanks again, I'm old but learning,
Marsha
Mackenzie Ryan says
Hi Marsha! Personally, I don't use cling film because I find that it embeds itself into the dough once the weights are added and becomes difficult to remove. If you don't have any cheesecloth, muslin, or (my favorite) parchment paper around, cling film would work in a pinch. I agree with you about the chemicals though, I would keep away from it if I have other options available.
Daisy says
I didn't even know about blind baking but I cook more than I bake so, yeah. I love how you explained why each point was important to do then included backup plans for each step. Again, beautiful photos, Mack!
Mackenzie Ryan says
You're so sweet, Daisy. Thank you 🙂